获取模板
目前已经能将data中的数据处理为响应式数据,接下来应该解析html代码的内容。
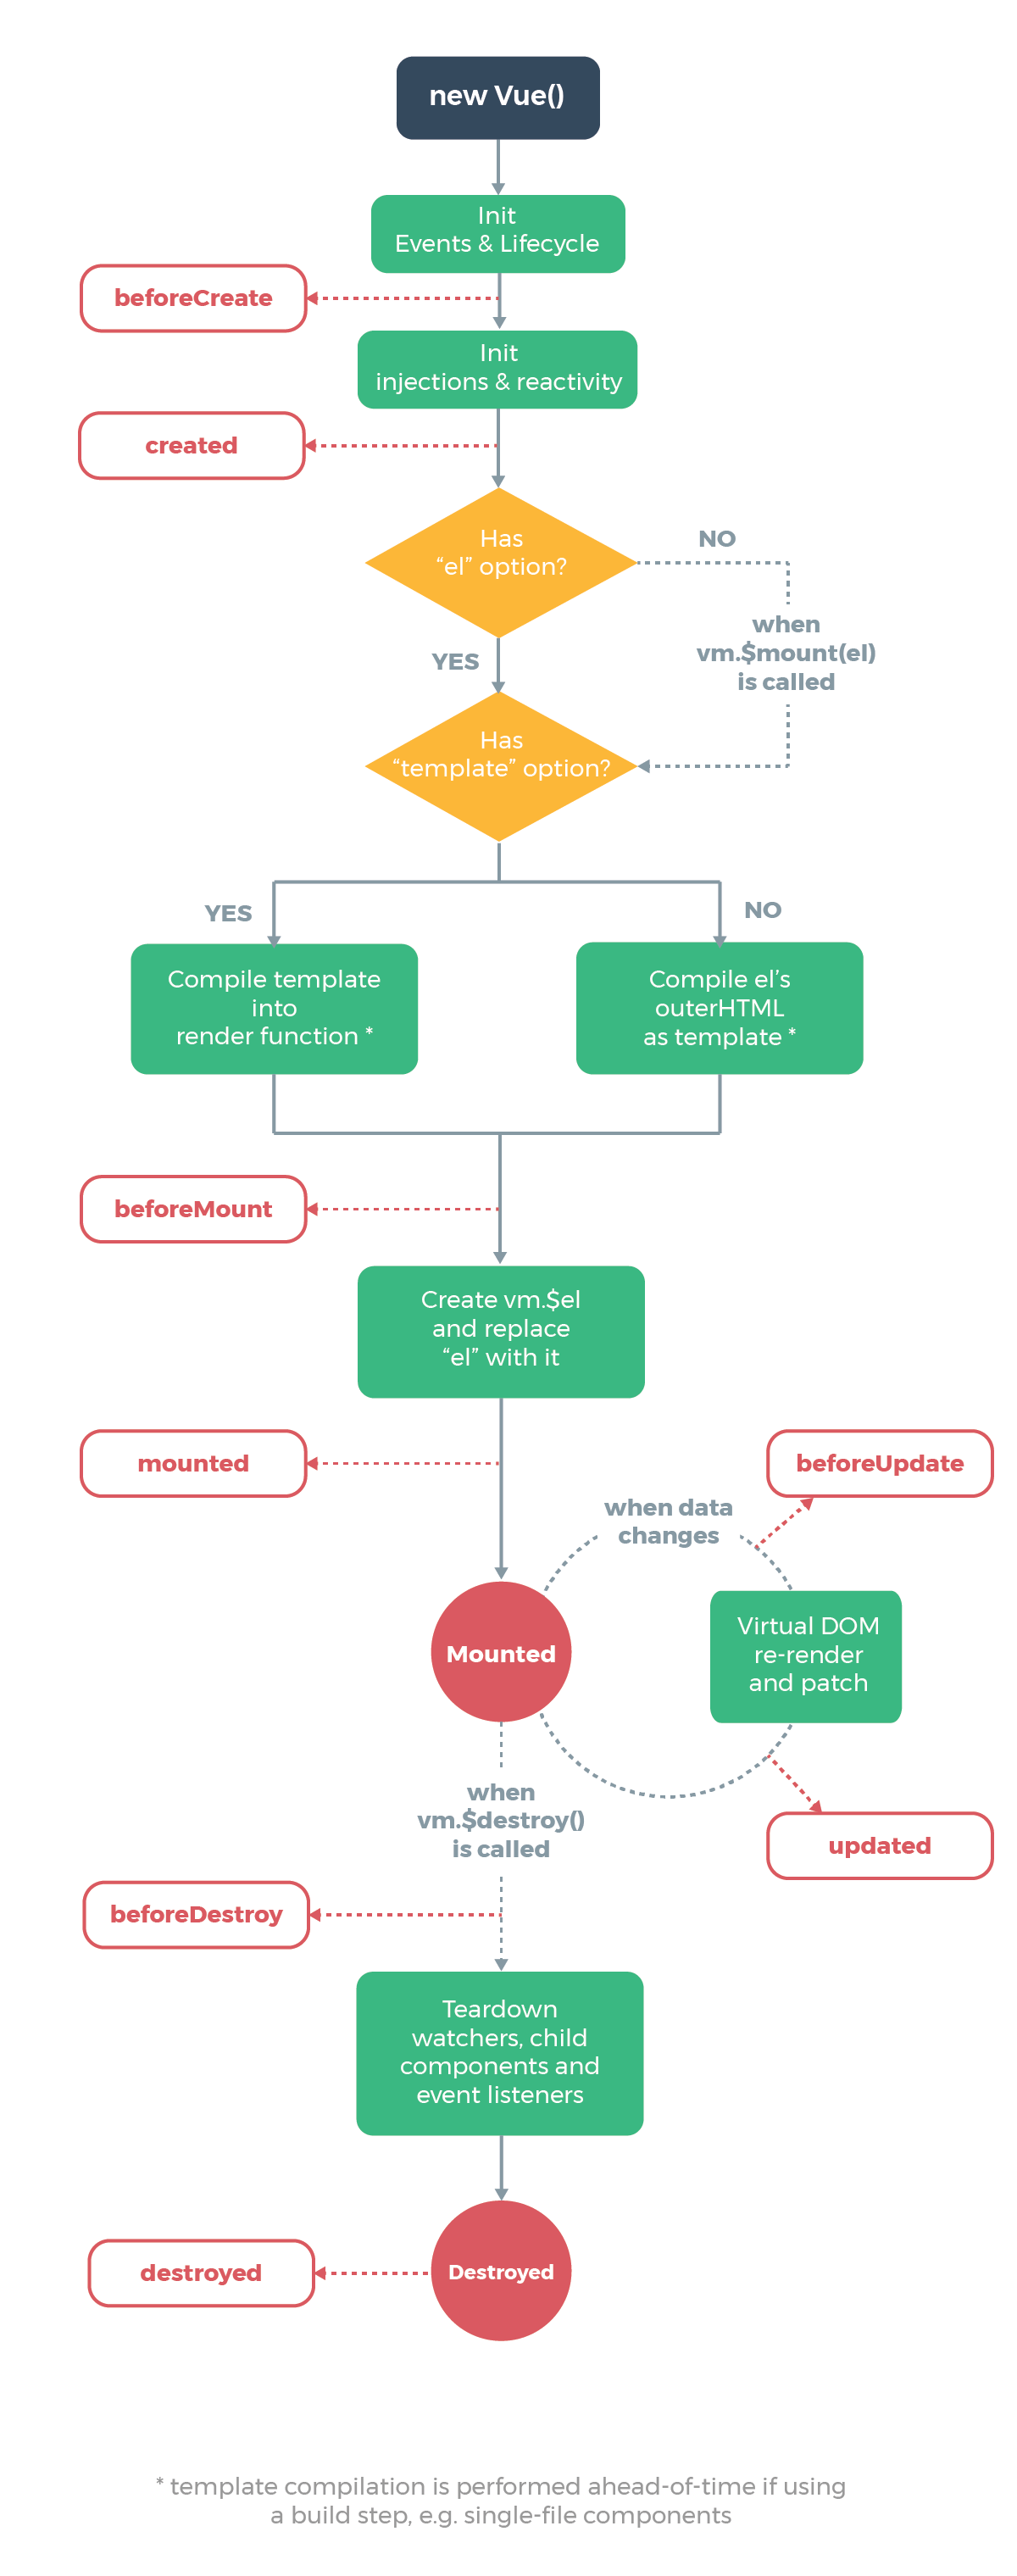
在vue的生命周期图示中,可以看到在created之后会判断是否有el选项,判断之后再判断是否有template选项。所以我们应当在init处理完data数据之后,再判断el和template获取应当渲染的html代码。
在init.js下边为在vue原型上增加$mount函数,在init中调用。
1
2
3
4
5
6
7
8
9
10
11
12
13
14
15
16
17
18
19
20
21
22
23
24
|
Vue.prototype.$mount = function(el){
const vm = this;
el = document.querySelector(el);
let ops = vm.$options;
if(!ops.render){
let template;
if(!ops.template&&el){
template = el.outerHTML;
}else{
if(el){
template = ops.template;
}
}
if(template){
const render = compileToFunction(template);
ops.render = render;
}
}
}
|
解析模板
可以看到上边代码最终编译部分是调用compileToFunction(),这个方法即是编译html模板的核心方法。这里我们抽出作为单独逻辑,新建文件夹compiler,在其中新建index.js。
index.js首先导出核心方法compileToFunction,这个方法我们要实现两个内容。
- 将html模板生成为抽象语法树(AST:Abstract Syntax Tree);
- 根据抽象语法树生成render函数。
1
2
3
4
5
6
7
8
9
10
11
12
13
14
15
16
17
18
|
export function compileToFunction(template){
let ast = parseHTML(template);
let code = codegen(ast);
let render = new Function(`with(this){return ${code}}`);
return render;
}
|
parseHTML即是编译AST的核心方法。
这里我们编译的逻辑主要是正则匹配。html的形式基本是<tagName attrs=””>textContent</tagName>。所以我们可以先用正则去匹配尖括号,代表标签的开始,通过字符串处理截取到标签名;后续是标签的属性attrs,直到出现反向的尖括号标签的头部结束。
头部解析完成后,接着的内容可能会是标签的textContent,也可能是一个新标签,所以解析的操作需要递归处理,并且需要一个栈用于判断标签是否配对(即括号匹配算法)。
那么将html的嵌套结构递归编译完成后,接着处理textContent,正则会匹配到尖括号开始,到尖括号代表着标签的结束,中间的内容就是textContent。而后匹配到</xxx>,也表示标签结束,应当与栈顶元素判断,匹配则出栈。
AST总共有五个属性,children可以放子元素,以此递归。
1
2
3
4
5
6
7
8
|
{
attrs:[],
children:[],
parent:null,
tag:'tagName',
type:1
}
|
大体逻辑如此,这一段逻辑被抽离到parse.js,具体代码实现如下:
1
2
3
4
5
6
7
8
9
10
11
12
13
14
15
16
17
18
19
20
21
22
23
24
25
26
27
28
29
30
31
32
33
34
35
36
37
38
39
40
41
42
43
44
45
46
47
48
49
50
51
52
53
54
55
56
57
58
59
60
61
62
63
64
65
66
67
68
69
70
71
72
73
74
75
76
77
78
79
80
81
82
83
84
85
86
87
88
89
90
91
92
93
94
95
96
97
98
99
100
101
102
103
104
105
106
107
108
109
110
111
112
113
114
115
116
117
118
119
120
121
122
123
124
125
126
127
128
129
130
131
132
133
134
135
136
137
|
const ncname =`[a-zA-Z_][\\-\\.0-9_a-zA-Z]*`;
const qnamecapture =`((?:${ncname}\\:)?${ncname})`;
const startTagOpen = new RegExp(`^<${qnamecapture}`);
const endTag = new RegExp(`^<\\/${qnamecapture}[^>]*>`);
const attribute = /^\s*([^\s<>\/=]+)(?:\s*(=)\s*(?:"([^"]*)"+|'([^']*)'+|([^\s"'=<>]+)))?/;
const startTagClose=/^s*(\/?)>/;
const defaultTagRE = /\{\{((?:.|\r?\n)+?)\}\}/g;
export function parseHTML(html){
const ELMENTTYPE = 1;
const TEXTTYPE = 3;
const stack = [];
let currentParent;
let root;
function createASTElement(tag, attrs){
return {
tag,
type: ELMENTTYPE,
children: [],
attrs,
parent: null
}
}
function start(tag,attrs){
let node = createASTElement(tag, attrs);
if(!root){
root = node;
}
if(currentParent){
node.parent = currentParent;
currentParent.children.push(node);
}
stack.push(node);
currentParent = node;
}
function chars(text){
text = text.replace(/\s/g,'');
text && currentParent.children.push({
type: TEXTTYPE,
text,
parent: currentParent
});
}
function end(tag){
stack.pop();
currentParent = stack[stack.length-1];
}
function advance(n){
html = html.substring(n);
}
function parseStartTag(){
const start = html.match(startTagOpen);
if(start){
const match = {
tagName: start[1],
attrs: []
}
advance(start[0].length);
let end, attr;
while(!(end = html.match(startTagClose)) && (attr = html.match(attribute))){
advance(attr[0].length);
match.attrs.push({
name: attr[1],
value: attr[3] || attr[4] || attr[5] || true
})
}
if(end){
advance(end[0].length);
}
return match;
}
return false;
}
while(html){
let textEnd = html.indexOf('<');
if(textEnd == 0){
const startTagMatch = parseStartTag();
if(startTagMatch){
start(startTagMatch.tagName, startTagMatch.attrs);
continue;
}
let endTagMatch = html.match(endTag);
if(endTagMatch){
end(endTagMatch[1]);
advance(endTagMatch[0].length);
continue;
}
}
if(textEnd > 0){
let text = html.substring(0, textEnd);
if(text){
chars(text);
advance(textEnd);
}
}
}
return root;
}
|
根据下边html结构生成的AST:
1
2
3
4
5
6
| <div id="app" class="app" style="background-color: yellow;font-size: 28px;">
<div style="color: red;">
<p style="font-size: 26px;">hello:{{name}},你今年{{age}}岁,</p>
</div>
<span>{{age}}</span>
</div>
|
AST:由于有原型,只能截图展示

生成render函数
parseHTML函数能够返回完整的AST,我们拿到AST后再以此生成render函数。这段逻辑通过codeGen函数实现。
render函数本质上仍旧是字符串,最终会作为一个函数运行,生成真实的dom。vue中的data数据能够在花括号中直接使用,所以当解析到花括号时需要去data中变量取值。而render函数就是内置三个编译函数用来处理。
_c(tagName,{attrs},children):创建节点函数,根据ast递归创建出真实的dom。
_v(str): 创建文本节点内容,即标签内部的内容。
_s(variable): 传入一个data中的变量,用于解析花括号表达式的值。
coedGen代码如下:
1
2
3
4
5
6
7
8
9
10
11
12
13
14
15
16
17
18
19
20
21
22
23
24
25
26
27
28
29
30
31
32
33
34
35
36
37
38
39
40
41
42
43
44
45
46
47
48
49
50
51
52
53
54
55
56
57
58
59
60
61
62
|
function genProps(attrs){
let str = '';
for(let i = 0; i < attrs.length; i++){
let attr = attrs[i];
if(attr.name === 'style'){
let obj = {};
attr.value.split(';').forEach(item => {
let [key, value] = item.split(':');
if(typeof value == 'string'){
value = value.trim()
}
obj[key] = value;
});
attr.value = obj;
}
str += `${attr.name}:${JSON.stringify(attr.value)},`;
}
return `{${str.slice(0,-1)}}`
}
function genChildren(children){
return children.map(child => gen(child)).join(',');
}
const defaultTagRE = /\{\{((?:.|\r?\n)+?)\}\}/g;
function gen(node){
if(node.type === 1){
return codegen(node);
}else{
let text = node.text;
if(!defaultTagRE.test(text)){
return `_v('${text}')`
}else{
let tokens = [];
let match
defaultTagRE.lastIndex = 0;
let lastIndex = 0;
while(match = defaultTagRE.exec(text)){
let index = match.index;
if(index > lastIndex){
tokens.push(JSON.stringify(text.slice(lastIndex, index)));
}
tokens.push(`_s(${match[1].trim()})`);
lastIndex = index + match[0].length;
}
if(lastIndex < text.length){
tokens.push(JSON.stringify(text.slice(lastIndex)));
}
return `_v(${tokens.join('+')})`
}
}
}
function codegen(ast){
let children = ast.children;
let code = (`_c('${ast.tag}',${ast.attrs.length > 0 ? genProps(ast.attrs) : null},${children.length > 0 ? genChildren(children) : ''})`)
return code;
}
|
上边html生成的render函数如下:
1
| _c('div',{id:"app",class:"app",style:{"background-color":"yellow","font-size":"28px"}},_c('div',{style:{"color":"red"}},_c('p',{style:{"font-size":"26px"}},_v("hello:"+_s(name)+",你今年"+_s(age)+"岁,"))),_c('span',null,_v(_s(age))))
|
执行render函数,生成真实DOM
在根目录下新建lifcycle.js,编译模板已经到生命周期created之后,相关初始化操作应当放在这里。
这里需要实现初始化之后调用一次渲染,并且要实现_c,_v,_s函数。
注意initLifecycle时,会在vue原型挂上_update和_render
1
2
3
4
5
6
7
8
9
10
11
12
13
14
15
16
17
18
19
20
21
22
23
24
25
26
27
28
29
30
31
32
33
34
35
36
37
38
39
40
41
42
43
44
45
46
47
48
49
50
51
52
53
54
55
56
57
58
59
60
61
62
63
64
65
66
67
68
69
70
71
72
73
74
75
76
77
78
|
import { createElement, createTextNode } from "./vdom/index";
function createElm(vnode){
let {tag,props,children,text} = vnode;
if(typeof tag === 'string'){
vnode.el = document.createElement(tag);
patchProps(vnode.el,props)
children.forEach(child=>{
vnode.el.appendChild(createElm(child));
})
}else{
vnode.el = document.createTextNode(text);
}
return vnode.el
}
function patchProps(el,props){
for(let key in props){
if(key === 'style'){
for(let styleName in props.style){
el.style[styleName] = props.style[styleName];
}
}else{
el.setAttribute(key,props[key]);
}
}
}
function patch(oldVNode,vnode){
const isRealNode = oldVNode.nodeType;
if(isRealNode){
const elm = oldVNode;
const parentElm = elm.parentNode;
let newElm = createElm(vnode);
parentElm.insertBefore(newElm,elm.nextSibling);
parentElm.removeChild(elm);
return newElm;
}else{
}
}
export function initLifecycle(Vue) {
Vue.prototype._update = function(vnode) {
const vm = this;
const el = vm.$el;
vm.$el = patch(el,vnode);
}
Vue.prototype._render = function() {
const vm = this;
return vm.$options.render.call(vm);
}
Vue.prototype._c = function(){
return createElement(this,...arguments)
}
Vue.prototype._v = function(){
return createTextNode(this,...arguments)
}
Vue.prototype._s = function(value){
if(typeof value == 'object') return value
return JSON.stringify(value)
}
}
export function mountComponent(vm,el) {
vm.$el = el
vm._update(vm._render());
}
|